Feeds:
Posts
Comments

Archive for the ‘Electronica’ Category

As regular readers will know, I always do the RPM challenge*

This year’s project was an attempt to build on the synthing and keyboard skills I’ve been learning over the past year or two so there’s very little violin on it. In fact the only track that has any violin at all, Carriageworks, was actually written for performance by Midnight Llama – though done here all my own. I like to experiment in RPM February and this year’s challenge, beyond the obvious time one, was to do a mainly keyboard-based album. Obviously not every single note of this album was played by hand – I own sequencers and arpeggiators – but quite a lot of it was, the piano lessons are starting to bear fruit.

For this project I took the themes of repair, renovation and recycling as my starting point. The title track, Carriageworks, was already written – and I mean “written”, I actually have a score for it – before starting the February recording marathon so I took that as the initial inspiration for the whole album. Karen (percussionist in Midnight Llama) had asked me to write a train piece for her drum pads and I wanted to do something a little different from the usual train journey piece. The overall theme of Carriageworks is a failing railway carriage that goes into the repair shop and emerges in rude health … for a while.

The other pieces take different ideas from that initial theme. The ideas behind Scrapyard and Bin Night should be fairly obvious from their titles, Brownfield is thoughts on a brown field site being developed sporadically (this is common in Leeds), Wide Closed Spaces is meant to evoke a large derelict building with old bits of broken industrial equipment in it and Metal Ink was inspired by tales of regeneration in Sabrina Peña Young’s novel Libertaria: Genesis, which I read after reviewing her album for Radio Free Midwich

On the album you’ll hear lots of synths, Simmons drum samples, recordings of buildings being pulled down and even me whispering into a microphone. Yes, this is the first time I have ever had my own vocals on a recording. I do not intend making a habit of this, I promise.

There quite a bit of Berlin School influence here too. This is mostly thanks to Stuart Russell, my co-synther in CSMA who got me into synths in the first place and is now educating me in the ways of sequencers, arpeggiators and drum machines.  Well, I say “drum machines” but most of the drums on this album are taken from samples in my E-MU synths. Only Bin Night uses an actual drum machine. In this case a lo-fi 8 bit device I bought in Brno, Czech Republic.

I’m really pleased with this album, it marks further movement in my musical style and capabilities and I think it sounds quite different from previous releases. It’s got drums and vocals on it for a start!


* Though I have never actually sent a CD into RPM challenge themselves

Read Full Post »

I was playing with the wonderful KMI QuNeo controller the other day and started experimenting with bending synth notes and/or filters using the pressure and X/Y positions on the pads – I’m a violinist, it’s what we do! This works really well for single notes but because things like bends and filter positions are a single CC sent to affect all of the notes played on a synth it’s much less useful when playing more than one note. Worse: if you move one finger then another, the CC value jumps between the two positions giving you a very glitchy sound. Some might like this effect but it’s not what I’m going for.

So, remembering that MIDI has an ‘aftertouch’ option I started looking into that. I didn’t really have a clear idea what aftertouch was, I’d played a StudioLogic Sledge2 synth in a shop and felt the extra travel on the keyboard and thought that seemed to be what I needed. However it turns out that there are TWO types of aftertouch.

‘Channel pressure (aftertouch)’ is pretty much just another modwheel-type controller – but usually controlled from the keys themselves which does make it handier than a modwheel when performing. It affects the whole synth though and therefore suffers from the same problem as a modwheel or global CC. This is the what most manufacturers seem to mean when they ‘support aftertouch’ I found out – including the Sledge. ‘Polyphonic Pressure (aftertouch)’ is the thing I wanted – and it’s much harder to find, in both synths and keyboards. The only synth I have that supports it is the Waldorf Blofeld (ah Blofeld, how do I love thee, let me count the ways). To test this I wrote a small Max patch that added Poly Pressure messages to the last note played on the keyboard, and controlled it from an on-screen slider (see video below). Using this I could bend one note in a chord while the other stayed the same. Yes!

The problem now was that the QuNeo, while being a very flexible controller, is actually very limited in what MIDI messages it will send. Basically it only sends note and CC messages – and they have to be on the same channel for each pad. Contrast this with the SoftStep2 (my first KMI purchase) that will send almost anything. Luckily I’m a programmer and have been working with my Raspberry Pi system for a while now so I wrote some code that converts the CC numbers sent by the QuNeo to PolyPressure messages.

The way this works is that all of the pads send notes when pressed and send the same CC number with pressure information, all on MIDI channel 10 (eg I press pad 4, it sends note on for MIDI note 44, and continuously sends CC 44 with the value of my finger pressure). The Raspberry Pi code then intercepts any channel 10 messages, converts any notes back to channel 1, and converts all CCs to channel 1 Poly Pressure messages. The sliders and knobs still send their existing CCs on channel 1 so that they can still do the normal global synth control things such as filter and volume changes.

I don’t know why Poly Pressure is so underutilised, I really like the results I can get with this system and really wish there were more polyphonic controls available, but I intend to make best use of the one I have, even if it’s only on one synth. It would also be nice if more synths supported it. I know some old synths from Ensoniq and Roland do but I don’t ‘do’ vintage synths – for reasons of my own.

Not even any softsynths (that I can find, though as I’m not a fan of them I didn’t look very hard) seem to do this which is bizarre given that it’s a logical place for that sort of code to reside. The fact that Ableton seems to actively remove poly pressure messages from the MIDI stream probably isn’t helping this *sad face*.

I suspect it might be catch-22. Few synths support polypressure because hardly any keyboards do, and hardly any keyboards do because few synths do. While researching this I did find a keyboard that supports Poly Pressure (supposedly) and have ordered it off eBay – because it’s discontinued. When it arrives (and if it does what I hope) I’ll update this blog post with the results.

Maybe I should save up for a Roli Seaboard  (eek!)

Here’s a video I made showing my experiments. In the first part you can see the filter setting jumping around. In the second I made a Max patch that was a proof-of-concept – mainly to make sure that the Blofeld did what I hoped it was going to do (note there’s a bug in that patch the doesn’t take into account NOTE OFF messages). Lastly there’s the QuNeo running via my Raspberry Pi system that converts CCs to PolyPressure messages.

Read Full Post »

NOTE: This post is obsolete – Roland have released a firmware update for the JU-06 (and the other Boutique synths) that allows them to send and received MIDI CCs for their various functions, and these are also documented. See here for details.


I ‘accidentally’ bought one of the Roland ‘Boutique’ synths last week – the JU-06 one. It’s a nice instrument with a simple front panel and a good sound. It has a few annoying limitations, only 4 voice polyphony and the small stereo output jack but generally I rather like it.

One of the things I immediately noticed was missing, slightly unusual in a digital synth, was any obvious (or, at least, documented) way to control it remotely – either from a DAW or control surface. Moving the controls sent no MIDI CC values and no CC value I sent to the device made any difference apart from the usual documented ones of mod wheel and sustain pedal. Slightly disappointed, I left it at that for a few days.

Then, yesterday, Rob Schroeder on the Synthesizer Freaks Facebook group posted a (very) rough outline of what the SYSEX format was for the boutique range of synths and I started playing. Initially I could get nothing from that either but a bit more research revealed that the synth only sends those SYSEX messages when chained to another similar device for extra polyphony. It also only sends these messages down the 5 pin DIN MIDI socket – not the USB – but that gave me enough information to work on.

I plugged in a MIDI interface, enabled chaining and started moving sliders and pressing buttons. BINGO – numbers started appearing on the computer screen I was monitoring it from! I now had (nearly) all of the information I needed. The last bit of information to get was the checksum. This was very easy to establish as it’s a standard calculation based on the contents of the whole message (except for the header F0 and trailing F7 bytes).

So, here they are. I only have the JU-06 but I’m pretty sure that the other 2 synths in the Boutique range behave similarly and will be as easy to reverse-engineer. Although the synth only sends these sysexes over the 5 pin socket, it’s happy to receive them over the USB link, which makes it more useful.

The SYSEX message looks like this (all values are in hex)

F0
41 (Roland SYSEX number)
10 (device ID)
00 (modelID)
00
00
1D (Product code for the JU-06 )
12
03
00
address MSB
address LSB
value MSB
value LSB
checksum
F7

For sliders, the value is an 8 bit number (0-255) split into two, so the bottom 4 bits are sent in the LSB and the top 4 bits in the (bottom half of the) MSB. For switches the values are 1 or 0 as shown.

Addresses for the functions are as follows:

LFO Rate:       0600
LFO Delay Time: 0602
DCO Range:      0700 (values 0,1,2)
DCO LFO:        0702
DCO PWM:        0704
DCO LFO/Man:    0706 (values: Man:0 LFO:1)
DCO Sub:        070C
DCO noise:      070E
DCO Wave: PW:   0708   (values 0 1)
DCO Wave: Saw:  070A      “   “
HPF Freq:       0800
VCF Freq:       0802
VCF Res:        0804
VCF Env invert: 0806 (values 0 1)
VCF Env:        0808
VCF LFO:        080A
VCF KYBD:       080C
VCA Mode:       0900 (0=gate, 1=env)
VCA Level:      0902
Env A:          0A00
Env D:          0A02
Env S:          0A04
Env R:          0A06
Chorus:         1000 (off=0, A=1, B=2, both=3)
Delay level:    1002 (values 0->0xF)
Delay time:     1004   “ “     “ ”
Delay FB:       1006   “ “     “ "
Bend Range:     1108

The checksum calculation is expressed simply in C as follows

static unsigned char roland_cksum(unsigned char *data, int len)
{
        int i;
        unsigned int cksum = 0;

        for (i=0; i<len; i++) {
                cksum += data[i] & 0xFF;
        }
        cksum = (0x100 - cksum) & 0x7F;

        return cksum;
}

for Max users, here’s an sxformat string you can use. It takes 4 inputs (sorry for the line break):

sxformat 240 65 16 0 0 0 29 18 3 0 / is $i1 / is $i2 / is $i3 
         / is $i4 / is checksum(1,13,2) & 127 / 247

So now I can control the synth from my Quneo controller along with other synths or even from the large MIDI keyboard using some custom software I’ve written for my host Raspberry Pi system. One of the especially nice things about this is being easily able to change the delay times – which is quite fiddly on the synth itself 🙂


Read Full Post »

After playing with Arduino microcontrollers I suppose it was inevitable that I turned to it’s larger brother the Raspberry Pi. The Raspberry Pi is more of a conventional computer but in a small form factor – in a box about the same size as the Arduino in fact.

This project was initiated by a thought I had when doing the large synth gig in Catford last month. In that gig I was using the laptop to drive one soft-synth, but without that it was really just there being a mixer – audio and MIDI – so I wondered if it was possible to do without the laptop at all. I have a hardware mixer so that can mix the audio output of the synths, but my large keyboard only has a USB socket for its MIDI output and power, and not a 5 pin DIN socket. So I thought of using a small computer to all the MIDI routing – automatically.

This turned out to be relatively easy for me, as an experienced C programmer. I got a Raspberry Pi starter kit, investigated the Linux ALSA (sound and MIDI) library calls and quite quickly wrote a small program that would route keyboard presses from a USB/MIDI keyboard to an attached synth. I also added a feature to send messages on MIDI channel 16 to a ‘Bass Synth’ (the Little Phatty or Minitaur) and also to forward any MIDI sync messages to all of the synths attached on the USB so that when Stuart has his Beatstep running in full Tangerine Dream mode all of the synths can run together.

Another feature is for it to behave as a TouchOSC->MIDI Bridge so that I can use the tablet to control the Blofeld as I did in this post. Some more work is need here to set the Raspberry Pi to run on a wireless network without a router as would be the case in a gig situation but that is in hand. I also intend to add a simple arpeggiator to the bass synth driver code.

So now I have a box smaller than many effects pedals that can do most of the work of a laptop at a synth gig. I plan to road-test this at a CSMA gig in Leeds in August.

Read Full Post »

Ambient DJ

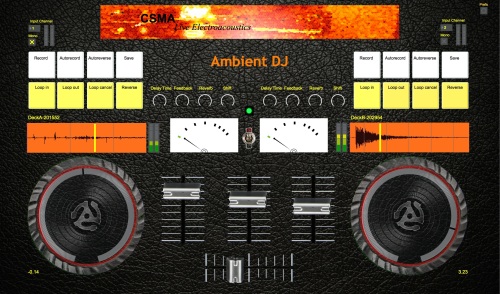
Ambient DJ is the slightly silly name I gave my program for live-sampling. It’s a large Max application that interfaces with a MIDI DJ controller to record samples and play them back at continuously variable speeds with looping effects and scratching.

The first outing for this software was a Network Music Festival where I performed with Stuart as CSMA a new piece called ‘Crowd Sources’. At this stage the software could only play back existing samples but that was fine as it was what was needed at the time.

The live sampling is a relatively new addition but has really become it’s major feature and I intend to use it in several contexts in the future as I think it’s a really powerful tool.

What it does

The software has two ‘decks’, each of which can hold a sample of up to 30 seconds long. The performer can change the speed of the playback from -5x to +5x continuously variable by spinning the turntable clockwise (increase) or anti-clockwise (decrease speed). When the ‘scratch’ button is pressed the turntables behave more like actual turntables and play the sample backwards or forwards in time with the movement. Playback can be set to auto-reverse when the start/end is reached and sub-sections can be looped. When in auto-reverse mode the turntables behave slightly differently in that a clockwise spin will always increase the speed even if the sample is playing backwards. This makes it possible to adjust the playback speed even when a short sample is being constantly bounced between a negative and a positive speed!

There are built-in effects – controlled by the knobs above the pads, delay/reverb/ pitch shift and a dry/wet control for the FX knobs. Also there are tone controls. Cueing also works and samples can be saved for future playback.

There is no facility to sync the two decks and I have no intention of adding it as it goes against the way I use the program. If anyone else wants to add it (as an option) then I’ll take the patch though 😉

The other thing the application does not do is try to emulate real DJ decks. If you want to do that then Serato or Traktor etc are still the best things to go for – this is not an open source version of them. The speed changes are deliberately smoothed to give an even sound, even when scratching.

Open Source

The software requires Max 7 to run and is available to download for free source form from github. I will be very happy to accept patches from people who want to add features or fix bugs in the software

Compatibility

The software was written around the Numark Mixtrack Pro II controller, but it should be possible to use any MIDI-based DJ controller, the mapping of CCs & notes to internal functions are contained in two text files that are read when the program starts up. They are data/ambientdj-cc.txt (for MIDI CC messages) and data/ambientdj-notes.txt (for MIDI notes). All you need to do is work out which buttons/faders/knobs on your controller match the function in the software you want them to do and edit them into one of those files.

If anyone does port the software to other controllers then please send your versions of the file to me!

Not for ‘tax-return’ musicians

This software is designed to work with a MIDI controller. it will do nothing without one. Although the display looks as though it’s functional, it is only for reference. and making it functional is harder than it looks believe me. But I don’t really want to be staring at a laptop screen on stage, there’s far too much of that already and I don’t really like it – it just looks like the musician is filing their tax return on stage rather than performing. So I’m very happy with this being a controller-based application. The only functional parts of the display are the middle switch that turns the audio on, the preferences button on the top right and the record routers in the corners of each deck.

The record router sections are designed to handle multi-input soundcards so you can have (eg) a stereo mic pair coming into one deck and perhaps a mono synth or guitar in the other. You just choose which input channel you want to use and whether it’s mono or not. Stereo inputs are assumed to be contiguous, so the number you choose (eg 1) is the left side, and the next one up (2) is the right channel.

Ambient DJ in action

Metering

There’s quite a lot of metering in the application display – I like to know what’s going on! The meters in the record routing section always show the input levels of the signals assigned to each deck, The meters next to each waveform show the playback level before the faders, and the central needle meters show the final output from the program – what is actually being sent to the soundcard. Bear in mind that the LED-style meters are peak meters and the needle-meters are RMS meters … so they won’t necessarily show the same values given the same input.

Here are a couple of videos of the software in action. Firstly performing Crowd Sources (without the live-sampling function)

And here performing Kelham Island, with the live-sampling in its embryonic state.

Read Full Post »

Cyborg violin is my, rather nerdy, name for a violin enhanced with odd electronics. I’ve attached hardware consisting of an IMU (accelerometer, gyroscope and magnetometer) a ribbon controller, light sensor and some multi-colour LEDs

How It Started

About a year ago I bought another electric violin with the intention of doing something whacky with it. At the time I didn’t know what that would be but was sure I would think of something. Initially I tried experimenting with different tunings and for most of its life before it became the cyborg it had an octave D string in place of the G and so was strung D’DAE – which was interesting … but not very!

In the meantime I was experimenting with other interfaces for the CSMA project with Stuart Russell and one of the things I enjoyed messing with was the Wii controller. Nothing radical here, Wii controllers have been a staple of experimental composer/performers since they became available, but it was fun to play with and we did a fun video of one controlling a soft synth, and even one with my (very much hardware) Moog Little Phatty.

While experimenting with this I started wondering how hard it would be to attach the Wii controller hardware onto a violin so that the instrument ‘knew’ its position in space and the player could modulate the sounds using gestures while playing. This would being a new dimension to a performance and probably, if done well, look interesting too. I’m not a hugely expressive violinist to be quite honest, I don’t do the ducking and diving that some rock violinists do, I tend to stay and brood and look mysterious mostly. Though that does seem to work for me as people have remarked favourably on it.

Chatting around I realised the Wii was not a particularly accurate instrument, it also needs 2xAA batteries and is therefore quite heavy. I did like the buttons on it though so wandered around the internet for alternatives that might fit the bill better. I was recommended to investigate the X-OSC. A small Wi-Fi equipped board that already contained the IMU as well as a multitude of analogue and digital outputs. I ordered one in October of last year – about the same time as I was playing with Arduino too.

Hardware

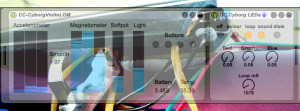
The X-OSC is very small, but violins are also small instruments and it took quite some thought to work out how to attach it to the violin without it getting in the way of playing or making it not fit into a case. I asked a couple of luthiers but I suspect they thought I was a madwoman and ignored me in the hope I would go away. So I did, and worked things out for myself. The X-OSC board now sits under the fingerboard (secured with blu-tak and elastic bands!) and attached to it are an LED ring on the headstock, a four-button switch array (on the side of the instrument), a soft pot ribbon-controller on the side of the fingerboard and a light sensor on the top of the body. All of this connects over Wi-Fi to Max on my laptop. The X-OSC can create an ad-hoc network for gigging purposes where there is no trustworthy Wi-Fi network. Perfect!

X-OSC mounted on violin and Max for Live patch

X-OSC mounted on violin and Max for Live patch

Software

The software started out as a standalone Max patch, mainly because I was learning to interpret the accelerometer and gyroscope outputs to give me a reliable orientation for the violin and to test the function of the other peripherals. I wanted the outputs to control effects on the laptop so I then put them into a Max For Live device and tried to work out how best to attach them to the Ableton Live effects and VSTs I wanted to use.

My first attempt had me sending MIDI output from the Max patch and then using the MIDI mapping feature of Live attaching them to effects functions. To to this I had to send the output of the Max processor to the internal IAC device and then back into Live. This worked and for initial tests seemed OK. It was very easy to map X-OSC outputs to different effects in Live and see what worked best for the violin movements. However it soon became clear that the latency involved was just far too long. There was so much MIDI data being sent that Ableton was getting clogged up and messages were being lost or dropped or delayed horribly. Something better was needed.

I was recommended, on Twitter, to use the Live Object Model (LOM) for this purpose. I’d played with the LOM a little before and found it a little complex to use. Also it would mean hard-coding device and parameter numbers into the patch which I wasn’t keen on – at least while the project was still under heavy development. Anyway I did a little test to see how the latency of mapped MIDI vs LOM stacked up. No contest – the LOM was much more responsive, this was obviously the answer. So I wrote a small Max patch to encapsulate the LOM operations transparently and then I could the LOM.Navigator device to work out where the effects were that I wanted to control. Actually this is, in some ways, even easier than mapping MIDI in Live. When mapping MIDI from the IMU there are 6 outputs constantly sending data so you have to mute 5 of them to be sure of only mapping the one you want – it’s actually quite annoying. With the LOM encapsulation all I needed to do was provide 3 numbers: track, device, parameter and it just worked!

There is one output on the violin too, that I alluded too. That’s a ring of 12 RGB LEDs on the headstock of the instrument. These can be set (using the buttons on the violin) to display either a circling ring of blue & yellow, a colour that changes depending on the accelerometer data or a sound-to-light display made using VIZZIE in a seperate Max For Live patch on a send track in the Live set.

The buttons turned out to be the least useful thing in the project. I thought that 4 would be too few, and bought 2 rows of 4 just in case. However because playing violin uses both hands quite intensively there is rarely time to press buttons, foot pedals are far more convenient. That’s why I relegated the buttons to choosing the LED effects. All of the other controls are on the Softstep and MIDI mapped in the usual way.


I can’t wait to get a chance to perform live with this instrument


Read Full Post »

I haven’t had time to blog about RPM 2015, but I have been doing it, despite being extremely busy for work, gigging and, to cap it all, laptop hardware problems.

This year’s album consists of four narrative pieces, based on some of the short stories in Jorge Luis Borges’ book “A Universal History of Infamy”. If you have the book it’s pretty obvious which is which I suspect, but if not don’t worry about it!

The structures are necessarily very different from ‘Mechanisms’, which were mostly classical in style, as I’ve tried to follow the narrative of the stories. Some events of the piece are explicitly played out and others are implied or affected but the thread of the story was always a strong indicator of where the music should go next. The stories in the book are mostly quite anti-climactic – rogues tend not to end well – so that gives the tracks a similar feel to some extent. I’m not sure if that’s a good thing or not so I’ll leave it at that.

Have a laptop fail on me half way through February has made it a bit of a strain to complete this. Some tracks have had bits done on three different computers due to hardware limits of the other two systems I have access to – also one of them is a Mac and the other a Windows system – I’m just extremely grateful that most DAW software is multi-platform these days! Anyway it’s done. There are some things I’d possibly like to change now, but don’t have the time or stamina to move all the many gigabytes of audio files across hard disks yet again.

The album is free/pay what you want to download as usual, and if you do decide to download it you will also get a copy of the live solo gig I played on the 22nd February … it’s technically allowed in the RPM Challenge ‘rules’, even if it’s not really related to the main theme of the album. Enjoy!

Read Full Post »

A couple of weekends ago I went to the di_stanze mini festival of electronic music and, on the Sunday evening, to see Steve Hackett’s ‘Genesis Revisited’ tour. Not much in common there you might think: new experimental electronic pieces in a classical concert hall, followed by a rock guitarist and his band playing music from the early 1970s. That would be a mistake. In fact the proximity in time of the concerts only served to highlight their similarities for me.

The major difference was that the music at di_stanze was all (to my knowledge) new pieces and the Genesis pieces were around 40 years old, but it’s important to note that they were in new arrangements. Steve Hackett makes no attempt to faithfully recreate the sound of the 1970s band, these pieces are truly ‘revisited’ using all the modern technology and techniques of a 21st Century rock band with considerable instrumental technique and knowledge of electronic music techniques from samplers & synthesizers to guitar pedals, guitar synthesizers and vocal effects.

One of the performers at di_stanze was the excellent Will Baldry, a hip-hop DJ who is using his turntables in new ways  to perform classically structured pieces and poetry to great effect. This shows the ‘classical’ world embracing and learning from other genres, The opposite also happens – Genesis’s 1970s material drew heavily from classical structures and ideas.

Steve Hackett’s extensive use of the Whammy pedal at the later concert brought to mind a piece by the normally brilliant Danish composer Simon Steen-Andersen who once used that pedal in a rather arch and slightly strained ‘one idea’ way that many classical composers seem to when adopting a new technology. By contrast Steve, like most rock musicians, is at home with new technology and it is fully integrated into the music so much that unless you know what is going on you might not even notice. it’s this seamless integration of technology into music that is often lacking in ‘classical’ compositions even today. I am pleased that this was (mostly) not the case at di_stanze.

One of the things that many classical musicians seem not have go the hang of is synthesizers. The only synth performance at di_stanze was an unimaginative piece of live-coding into a Juno polysynth. I wish people using this sort of equipment would listen to, and learn from, performers such as Roger King (of the Steve Hackett band) who use multiple synthesizers (soft, and hardware) to make real, high quality music, and not just a collection of sounds.

Read Full Post »

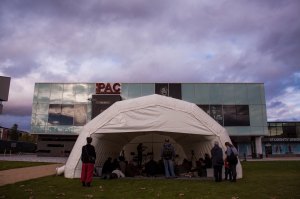
Soundspiral outsideHere it is at last – the Soundspiral video!

It’s been about 18 months since I was asked to perform in the Soundspiral. I chose ‘Ada’ partly because it was a major new (at the time) piece I was very proud of, and partly because it was always meant to be quite an immersive piece that I thought would be appropriate for the Soundspiral. Since that time I have performed half of it in 7.1 and the whole thing twice in stereo in Second Life.

The Soundspiral version is more than all of those in several ways. Of course it’s in 52 speaker surround sound, but in the meantime I’ve been tweaking the parts and samples to make them better and convey the subject matter more clearly. I hope.

Of course, I didn’t generate the full 52 channels from my laptop into the spiral speakers, that would be insane … and impractical. For a start the rig doesn’t actually have 52 inputs but mainly it’s not meant to be addressed that way. The software system that drives the spiral (written by the hugely clever Daz Disley) can drive the speakers in spaces rather than individually. This gives the sound a great coherence and ensures that when things move, they don’t just disappear from one speaker (or set of speakers) but they move smoothly and naturally. It’s immensely impressive and gives the spiral a very clear and listenable sound.

From 2dgoggles, ‘The Client’ by Sydney Padua.

I ended up giving Daz 14 channels that were effectively 7 stereo sets. Dividing the spiral into 4 quadrants lengthwise and top and bottom sets. The last stereo set was for the live violin playing which I originally thought would move with me, but in the event that turned out to be unnecessary. Most of the played back samples were positioned using this system – one send for each stereo pair. There was very little movement of sounds involved, i wanted to create a space, rather than go ‘Hey, we can spin things round, isn’t that great!’ that some surround systems seem so keen on. The spacial idea was inspired by the Sydney Padua cartoons where Ada is lost in the internal workings of the Analytical Engine (see above) and this is depicted in the last 3 minutes of part 1.

A central pillar of the piece is a piece of text where Ada effectively predicts the ability of computers to compose music (soon followed by some automatically generated music – played while I change violins!).

The performance was part of the first Sonophilia festival in Lincoln and I am pleased to report that it drew a good crowd and several people came up to me afterwards to say how much they enjoyed it. I was pleased with my performance, and below is a video of the event for your enjoyment.

Read Full Post »

CSMA is a synthesizer/laptop duo Stuart Russell and I formed recently, our inaugural gig will be at the Network Music Festival in Birmingham in September.

This gig will be purely sample-based and using laptops only rather than synths so I was looking for an interesting control surface to use – I don’t like watching laptop players working just on the screen/keyboard, it’s indistinguishable from them playing a prebuilt WAV/MP3 file while messing around on Facebook or Twitter 😉

The idea

One of the things I was wanting to do with this show was to speed up and slow down the samples as they played – Stuart had already written a sample “tape scrubber” in Max for Live – and it occurred to me that the standard DJ decks would be an ideal tool for this, they have two decks that can rotate quickly as well as an army of faders and often pads that I could use to change the sounds or launch other clips.

To test the idea I made a dummy version of a DJ control surface using TouchOSC on my Android tablet, connected it to Ableton Live and had great fun with it, eventually producing this proof of concept piece.

The purchase

Inspired by that I went to the lovely Production Room in Leeds where they let me play with the Numark Mixtrack Pro-II controller for a while and I had fun with that, and came out with one. While playing with the device in the shop it was obvious to me that the encoder controls and the decks did not work quite right in Ableton but I was confident (over-confident as it turns out!) that something could be done to fix this.

The problem

Wondering if the encoder problems were specific to Ableton I tried the device in IntegraLive. This is a relatively new tool, aimed squarely at live performance of electronic music and customisable using Pure Data(PD). It has lots of good features that meant we were keen to use the software for this project. However IntegraLive had the same trouble with the encoders as Ableton did so, being a career programmer, I delved into PD to see what codes were emitted on the MIDI stream by the devices and how they should be interpreted. This took me under an hour to crack, and I had an “Encoder decoder” patch working. It took me only a little longer to integrate that into Stuart’s ‘tape scrubber’ patch (which by then also had a PD version), so I set about integrating that into IntegraLive. This was where even more trouble started.

Modules – or not

IntegraLive has a module builder which is the way that PD patches are incorporated into the software. It supports separation of form & function (a good thing[™]) where the form is the PD patch set and the function is drawn using its own tools. The communication between these is arcane to be quite honest, and it took quite a while to alter the patch so it understood the messages coming in. It was very far from the smooth integration in Max For Live, though this is understandable in a small, open source project. A bigger problem for me was that once inside the module there was no way to debug what the patch was doing – I couldn’t tell which messages were being sent or what the software was doing with them – it was click-and-hope really and it got very frustrating. I never did get that module to work, even basically. Another problem I had with IntegraLive was that it often refused to acknowledge that I had any MIDI drivers or devices, despite several being connected. This was a killer bug for me. I can’t afford to go on stage and not do a set because the software can’t see the control surface on the desk next to me. There seemed to be no workaround that was reliable and shortly after it started doing it for audio devices too. Clearly unacceptable

So, while I like IntegraLive and hope to use it in future, this project was too soon to be trying to get software integrated and bugs fixed in time for it. I went back to Ableton and Max for Live.

Over optimisation

However, this was not without its problems. I ported the encoder-decoder patch I wrote for PD into Max and incorporated it into the M4L tape scrubber but it didn’t work. I was baffled. I searched for some potential incompatibilities between the similarly-named objects in PD and Max but could find none. I inserted print and number boxes in the code and eventually discovered that a huge number of the MIDI messages send by the encoders were just being thrown away! I suspect this to be an Ableton “optimisation” as I have read of such things before, but I can’t prove it just yet as I don’t have standalone Max/MSP to test it.

Encoders (which includes the decks on the Mixtrack Pro-II as well as the FX controllers) send a MIDI CC value which is a signed byte stating (roughly) which direction and speed it is being moved. So a gentle move clockwise sends a 1, and gentle move anti-clockwise sends 127(rendered unsigned); a fast movement could send a higher (signed) number e.g. 2(clockwise) or 125(anti-clockwise) for example. The problem is that Ableton filters out all of what it sees as duplicate messages. So if you move the encoder clockwise in a normal fashion, then all your Ableton device (including M4L patch) sees is a single CC of value 1 … this is no use at all!

There is obviously some way round this for certain devices, there are drivers for Push (obviously) and things like the Novation Remote SL that have encoders and I am assuming that those device’s encoders work fine. But there seems to be little documentation on how to write such drivers and what little I found seemed to involve coding in the Python language, something I am unfamiliar with, and I was very reluctant to start learning yet another complex system in the vague hope that it might be able to fix something, but wasn’t guaranteed to achieve anything.

A sort-of solution

In the end I settled for a rather hack-ish system where I have PD read the raw MIDI CCs coming from the Mixtrack device, that patch reformats the encoders to look like normal rotary controls and sends the result using the internal MIDI channel to Ableton. Other MIDI messages it passes through unchanged. This works OK, though it loses a lot of the resolution of the decks. It’s not a huge problem for this project, but it would be useless for a real DJ I imagine. The latency for this seems acceptable to me so it’s probably how I will run things on the day. I really don’t want to be spending even more huge chunks of time working out how to do this … there’s music to be made!

In the end I have something that works. It’s taken me a little over three days to get to this point – and I’m quite a strong programmer – so it’s now no surprise to me that nobody else seems to be using these devices in such a way inside Ableton … or any other software for that matter.

Some sorrow

The jettisoning of IntegraLive is a source of some sorrow to me. I like to support open source projects and this software has huge potential, and a lot of really nice features for live performance that no other software does. The design is well thought out and it’s not just a DAW that can be used on stage, it’s a whole new paradigm for live use, which I like. However it seems to be hard to integrate new modules into the system and it has some bugs that are show-stoppers. I hope these things can be fixed (and I’m prepared to help out where I can) so that it can become a good capable performance system.

But the show must go on

So that’s what I’ve been up to this week, we will be playing at the closing concert at the Network Music Festival in Birmingham on the 28th September … come along if you can!

Read Full Post »
« Newer Posts - Older Posts »